89 IV
Opening Preparation
Mark Dvoretsky and Artur Yusupov
With contributions from:
Sergei Dolmatov
Yuri Razuvaev
Boris Zlotnik
Aleksei Kosikov
Vladimir Vulfson
Translated by Joint Sugden
В. T. Batsford Ltd, London
First published 1994
© Mark Dvoretsky. Artur Yusupov 1994 Reprinted 1994, 1996 ISBN 0 7134 7509 9
British Library Cataloguing-in-Publication Data. A CIP catalogue record for this book is available from the British Library.
Ail rights reserved. No part of this book may be reproduced, by any means, without prior permission of the publisher.
Typeset by John Nunn GM and printed in Great Britain by Redwood Books, Trowbridge, Wilts for the publishers, В. T. Batsford Ltd, 4 Fitzhardinge Street, London W1H0AH
A BATSFORD CHESS BOOK
Editorial Panel: Mark Dvoretsky, John Nunn, Jon Speclman
General Adviser: Raymond Keene OBE
Commissioning Editor: Graham Burgess
Quite honesdy I am proud of my
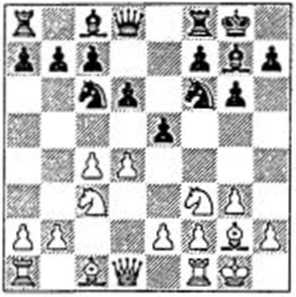
What docs the opponent want to do? It is always useful to ask yourself this question. Most likely. Black wants to exchange off his bad bishop with l6...Ah6.
Should I consent to the exchange? If I remove my bishop to b2 or gl, the black bishop will be controlling the cl square and it will be hard to carry cut my natural plan - pressure in the c-ftlc with my major pieces against the backward pawn on c7. In addition, the black knight will acquire the excellent g5 square in the vicinity of my king.
It is very dangerous to ‘stick to your principles’ and make stereotyped judgements - such as 'if my opponent’s bishop is "bad", that means I mustn’t exchange it.’ Any rule has numerous exceptions. I had a think, and decided ‘There’s nothing for it - I’ll have to exchange.’
But where should the exchange take place? I can let Black take on c 1, which enables me to occupy the c-filc with tempo. Or I can capture on h6, when the black knight will be badly placed. The latter solution appeared sounder.
But how am I going to arrange my pieces on the c-file? The most natural build-up is: queen to c2, rook from fl to cl, and the rook from bl can be transferred to c3. That means
I have the choice between 16 Wc2 and 16 Zb3. The rook move is evidently more precise; after the exchange on h6, there may be die chance of a double attack with We 1 hitting c7 and h6 at once.
This last consideration was to be fully vindicated (albeit in a slightly different form) in a game I played two years later against Kremeniet-sky (USSR Championship, Kharkov 1968). He answered 16 2b3 not with 16...£.h6 but with 16...h6. I continued according to plan with 17 Sc3, and after 17...£}g5? 18 Jtxg5 hg 19 Well two black pawns were indeed under attack: c7 and g5.
16 Eb3l! Ah6
17 ДхЬб Qxh6
18 2сЗ Zf7
What should I play now?
The natural plan is Wc2 and Zcl. Black will protect his pawn with ...2c8. What then? Obviously a quecnsidc pawn offensive, but a well-known positional maxim is relevant here: before advancing, you must give yourself something to fasten ' on - an object of attack.
19 Wei! &g7
20 Wa3 a6
Forced - Black has to free his rook. But now the pawn on a6 makes it easier for White to open lines on the queensidc. He will play a2-a4 and b4-b5; after ...a6xb5 he will most likely recapture on b5 with the queen.
21 Efcl Ec8
22 Wb3 (85)
The more active move 22 И'аЗ deserved attention.
85
В
What is Black to do now? He has a ghastly knight on h6. The natural strategy is to bring it to a better square with ...?ig8-f6. Then, if the c-pawn needs more protection. Black has ...€k8.
Another tempting idea is 22...#b5 followed by 23...Ш, trying to confuse White with threats of penetrating on e3 or f2.
Given correct defence, I think Black’s position would be tenable although inferior. But my opponent chose a faulty plan.
22 ... g5?
Timoshchenko is launching an attack on the white king - or rather he thinks he is. The standard reaction to the opponent’s activity on the flank is a counter-stroke in the centre. But 23 d4? is met by 23...fc, then ...?}g4 or ...й^4, ...ПсП! - suddenly all the black pieces start attacking. So thc-stock recommendation will not do just now.
What does Black want? Is 23...g4 his intention? If so. White has the splendid rejoinder 24 f41. The pawn on g4 is then depriving the queen or knight of that square.
Now let us think about 23...f4. White cannot reply 24 g4? on account of 24...^xg4. What is the drawback to Black's move? It removes the pressure from the White e-pawn - so now I can strike at the enemy centre with 24 d41, simultaneously switching the rook and queen to the defence of the kingside.
This means that at present I have nothing to fear; I have an answer to each of my opponent’s attacking moves. It means I can coolly make a useful move on the quccnside. Quite a good example of precise logical deduction based on ‘prophylactic thinking’.
23 a4! f4
24 d4
AH according to the rules. A central counter-stroke - and a timely one - against the opponent’s flank attack. Bl ... ..as two attacking possibilities. He can play ...g5-g4 at once, or exchange on g3 first. But after 24...fg 25 hg g4. White has the very strong 26 f41.
24 ... g4
25 de de
Now how should White continue? I saw a superb outpost for my knight on e6.
26 gf! ef
27 £d4 ФИ8
28 Олб c6
29 ^b2!
A technically precise move. Try :o increase your attentiveness to such ‘small’ points. I make my opponent move to g8 with his king, after which I don't have to fear any counterplay on the g-filc. I could undoubtedly have won without this, but it is always useful to limit the opponent’s possibilities before anything else.
29 ... ЭД
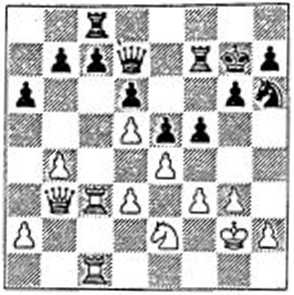
30 bS! (86)
S6 в
йдядия
& щ адя

White’s opening plan - his queenside offensive - triumphs.
30 ... ab
31 ab gf+
32 ФхГЗ QfS
Such ’kamikaze’ moves crop up quite often in desperate situations. You must take maximum care in attending to these final outbursts from your opponent; give him no counterchances whatever. The knight can be taken of course, but why permit the slightest intensification of the fight?
33 2gl+ Qg7
34 be be
35 Sc2!
The game is won by quiet moves.
Black cannot take on d5, and 36 2cg2 is threatened.
Black’s last hone is 36 Zcg2? Пхеб.
36 Zxc6 is also strong.
36 ...
Of course, 38...<i2xgl is also completely hopeless.
39 Qxe8 1-0
I had to use written notes to demonstrate some of the previous games to my audience, but I can recall the Timoshchenko game without any prompting - even though it was played a quarter of a century ago! Why? Because I once subjected it to thorough study, scrutinising the sense of every move; for me this is a game to refer back to, a standard game for the opening variation in question.
Dyed-in-the-wool King’s Indian players sometimes try to obtain their accustomed positions with colours reversed and a tempo more. It might appear fairly simple, if you know the ideas of this opening, to utilise the extra tempo advantageously. In actual fact there arc no easy tasks in chess, and an extra tempo doesn’t always bring gains. Why? One thing that remains firmly implanted in my memory is a comment by Mikhail Tai on a wholly symmetrical position in the English Opening, which arose in the first game of his Candidates Match with Lajos Portisch in 1965:
'Of course it would be ridiculous to speak of any advantage for Black in this symmetrical position, but it is one hundred per cent true that playing the Black side is easier. The point is that as long as his opponent's moves seem to him to be the strongest, he can copy them with a clear conscience and wait for a convenient moment to "vary"; whereas White is compelled to act on his own initiative.1
Something similar applies to the exploitation of an extra tempo in positions with reversed colours - the need to act on your own initiative constitutes the whole difficulty. Let me show you an unfortunate instance from my own experience. To understand it better, I will first briefly acquaint you with a variation of the King’s Indian Defence which I used to play with Black - and from which I took the ideas that I vainly tried to implement when reaching the same position with White.
1 d4 ФГб 2 c4 g6 3 £c3 Ag7 4 e4 d6 5?}f3 0-0 6&e2e57d5 £bd7 8 0-0 £cS 9 Wc2 a5
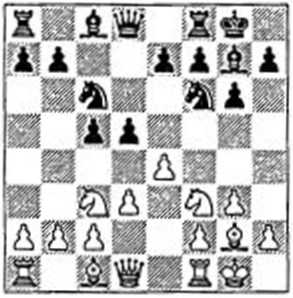
The main line here is 10 Ag5 h6 11 Ae3. The move 10 3jd2 went out of use on account of Geller's reply I0...Ah6! (87), which has the aim of exchanging Black’s 'bad’ bishop.
87
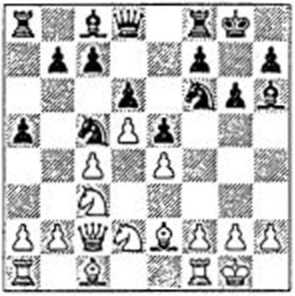
After 11 £>b3 Axel 12 Eaxcl £lfd7, or 12 &xc5 Ah6 followed by ...£ld7 and ...f5, Black stands quite well. Mukhin once played 11 b3 against me; I replied Ц...Фе8, carried out ...f5, and won in good style.
Now, equipped with this little piece of information on the King’s Indian, consider the following game.
Dvoretsky-Alburt
Odessa 1974 King’s Indian Attack
|
1 |
&ГЗ |
£f6 |
|
2 |
g3 |
c5 |
|
3 |
Ag2 |
£c6 |
|
4 |
0-0 |
d5 |
|
5 |
d3 |
e5 |
|
6 |
£bd2 |
Ae7 |
|
7 |
c4 |
d4 |
|
8 |
4k4 |
£d7 |
|
9 |
a4 |
0-0 |
|
10 |
Ah3 |
Naturally I am applying Geller's idea. When you play an opening with colours reversed, you have to know the ideas for playing it the usual way round.
10 ... tfc7 (88)
88
IV
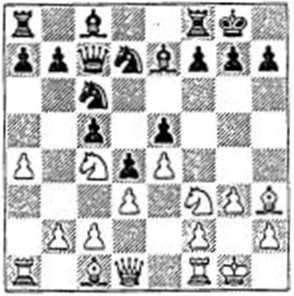
As you see, the position is exactly as before, but I have an extra tempo. What should I use it for? I decided to prepare f2-f4 by means of 11 £>el. Yet, however paradoxical it may seem, this move did not improve my position - it worsened it. I must have been misled by the analogy with my game against Mukhin, but a more serious factor was my reluctance to think, to probe into the concrete details of the position. A good example of the harm that comes from playing by rote!
But what should I have done? 11 £>fd2 locks tempting. If Black plays 11...ФЬ6, White’s move is fully vindicated. An answer that must be taken into account is ll..JLg5 (with the same idea as White's 10 Ah3 - to exchange off the ’bad’ bishop). Can you see how White should continue after that? I think the only correct way is the gambit 12 f4! cf 13 <lf3 Ji.h6 14 ?}h4!. I would not advise Black to go into this position. See what interesting possibilities turn up in a situation which a moment ago seemed to us wholly transparent and lacking in interest!
Black should most probably meet White's positional threat of f2-f4 with the typical blockading operation U...g6!? 12 f4 cf 13gff5. The game acquires a new complexion, which in my view is not unfavourable to Black.
Apart from 11 £ifd2 what else can White do? Nothing in particular -perhaps just the minimally useful moves 11 b3 and 11 $h 1. So the extra tempo seems to bring no great benefit here. All the same, White docs have a fairly good position, and wc have agreed that when playing openings with colours reversed wc are not counting on an advantage but on 'our own’ type of game.
11 £cl? £b6
12 Дхс8 ЙЪсв!
With the white knight on f3, this possibility would not exist. When Black played this move, I started worrying. The positional threat of ...f7-f5 has arisen. For example, after 13 b3 £xc4 14 be f5 15 ef Wxf5 White’s pieces arc absurdly placed, his knight will never get from el to c4. Black will aim to play ...c5-e4 at some moment, perhaps after first bringing up his pieces and placing his knight on b4.
13 ?Jxb6 ab
Threatening 14...b5.
14 £d2 f5
15 cf WxfS
16 f3
Black could now have gained the advantage with 16...Bh3!. Then 17 Wc2 b5 would be bad for White, while 17 <5)g2 could be strongly met by 17...Ef5,' intending 18...Sh5. White’s position creaks on both sides of the board.
But I was lucky - my opponent quite unnecessarily went in for complications.
|
16 ... |
c4?! |
|
17 Be2 |
Дс5 |
|
18 &g2 |
c3! |
18...Eac8 is met by 19 de c4 20 fe Sxe4 21 'ЙУЗ.
19 be b5
20 a5
At this point Alburt offered a draw. With optimism unwarranted by the position, I refused. But after a tense struggle the game concluded peacefully all the same.
In the next example. White used his extra tempo more effectively.
Dvoretsky-Tataev Beltsy 1972 King’s Indian Attack
|
1 |
e4 |
c5 |
|
2 |
£f3 | |
|
3 |
d3 |
W |
|
4 |
g3 |
Феб |
|
5 |
£g2 |
£f6 |
|
6 |
0-0 |
d5 |
|
7 |
£c3 |
0-0 (90) |
I had repeatedly reached this position with Black, after I d4 <£f6 2 c4 g6 3 fcf3 £g7 4 g3 0-0 5 Ag2 d6 6 0-0 <5k6 7 £te3 (Black sometimes plays 7...Af5 or 7...Ag4 here, but 7...a6 is the most popular of all) 7...e5 (89).
89 IV
White has the choice between 8 de and 8 d5. The pawn exchange is not as innocuous as it looks. At first I replied to 8 de with 8...de. But in the variation 9 Wxd8 Sxd8 10 £g5 Деб 11 <?id2 it is not so easy to achieve equality, for instance: ll...h6 12 Дх(6 Exd2 13 Axg7 *xg7 14 Дхсб be 15 b3, and White’s chances are somewhat better thanks to his superior pawn structure (Koifman-Dvoretsky, Moscow Championship 1966).
The game Vaganian-Dvorelsky, USSR Championship (First League), Tbilisi 1973, went 8 de £)xe5 9 2>xe5 de 10 w'xd8 Sxd8 11 £g5 Ed4! 12 еЗ?! Ixc4 13 Sacl c6! 14 ДхГб £xf6 15 2>c4 Zxcl 16&xf6+ £g7 17 Фс8+ ФГ8 18 Excl Фхе8 19 Ехсб Дсб! 20 Пс5 Sc8 ’A-’A. White similarly gains nothing from 12 b3 c6, but he can maintain the pressure with 12 <2k!51 £ixd5 13 cd c4 14 Sfdl; theoretical books give inaccurate information here.
After 8 d5 Фе7, Yurkov played 9 c5 against me in the 1966 Moscow Championship. At that time I had just gained the Master title. I didn’t know much about the theory of this variation, and had never seen the move 9 c5. Since Nimzowitsch’s My System, which I had formerly studied with great pleasure, was still in my memory, I succeeded over-the-board in finding an idea on the Nimzowitsch pattern, involving a blockading knight: 9...l!tje8 10 cd £xd6. There followed 11 e4 c5?l 12 a4?! £d7 13 Eel h6 14 b3 f5, with a good game for Black. White could have seized the initiative with 12 de Фхсб 13 &g5! f6 14 ДеЗ, with 15 Дс5 to follow (Ivkov-Uitumen, Palma de Mallorca 1970). Therefore Black does better not to hurry with 1 l...c5 but to play ll...h6! first, and then, according to circumstances, 12...С5, 12...C6 or 12...Г5.
The main line is 9 e4 £ld7. In Doda-Dvoretsky, Polanica Zdroj 1973, there followed 10 £el f5 11 £d3 Qf6 12 □?! (better 12 f4. as Etruk had played against me a year earlier) 12...h6! 13 ^d2 g5 (threatening 14...f4) 14 ef ^xf5. The initiative is on Black’s side; his further plan is ...'S'eS-ge, ...GM4, ...Д(5, ...Ef7. ...Eaf8, ...h5, ...g4.
Bringing the knight to d3 is slow. White should choose between 10 ДеЗ, 10 .fcd2 and 10 b4. The unconventional 10 Qg5!? h6 11 £3h3 is also worth considering, followed by 12 f4.
After this digression into the realms of King’s Indian theory, let us return to Dvoretsky-Tataev.
90 w
I have an extra tempo, then. Which moves are useful to White, and which are not? What do you think of 8 Eel, for example? Well, that would be a move in the style of my game with Alburt - it worsens White's position instead of improving it. Black replies 8...d4 9 ?te2 e5. Now White needs to bring about f2-f4, and with this in view his rook is clearly better on fl than on el.
8 h3!
In any circumstances it will be useful to cover the g4 square - either in the ending resulting from 8...de, or in the closed position after 8...d4. Since I knew the ideas of the corresponding variation of the King’s Indian Defence, which we have just been discussing, it was not at all difficult to find the correct solution here.
My opponent didn't want to play a theoretical position with a tempo less, and he tried to think up something a little new.
8 ... h6
9 Od2!
If now 9...d4, it would be obvious that my last move was useful. But I had to take the capture on c4 into account. I didn’t much like the position after 9...de 10 de, since Black controls the d-filc and the point d4.1 intended 10 Фсхе4 (with this knight, so as to answer 10...£ki7 with 11 £jb3) 10...43xc4 11 £}xc4. How is Black to defend his pawn? U...b6 will not do. If ll...Wa5, then 12 ■2ld2. There remains ll...Wb6, but then there follows 12 Ae3 «xb2 (12...^4 13 c3 £c6 14 b4) 13 Sbl Wxa2 14 Фхс5. Those who play the Benko Gambit should like this position. In that opening, working up overwhelming pressure on the opponent’s queenside is not always as easy as it is here.
So either 9...d4 or 9...dc will be in While’s favour. But Black’s pawn on d5 is under attack. It follows that Black must choose between 9...Де6 and 9...e6. In either case the advance f2-f4 which While is planning will gain in strength.
9 ... c6
10 f4
This time 10...dc will be met by 11 de followed by 12 e5. A White knight will go to c4, and two very unpleasant ‘holes’, on d6 and f6, will appear in the Black position. It is therefore bad for Black to open the centre.
10 ... Ьб
11 ФЬ2 Даб
12 e5 (91)
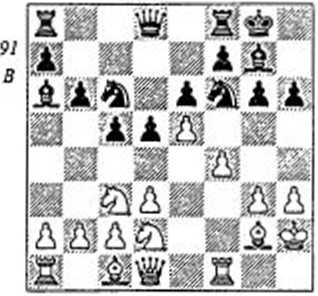
An interesting positional exercise: should the knight retreat to d7 or eS? (We won’t even consider h7, where the knight is out of play.)
What is Black planning to do subsequently? Of course he is not going to weaken his pawn chain with ...f7-f6. He intends to gain space on the quccnsidc with ...Ь6-Ь5-Ь4. How will White react? He will probably hinder this plan by playing a2-a4. Al the same time a knight excursion to b5 will become feasible. After 12...-&c8 Black can bring his bishop to b7, then play ...аб, ...£c7 and ...b5. White’s *£b5 will not be dangerous, since from c8 the knight controls d6. With the knight on d7, by contrast, none of this play will be available. White will achieve a clear plus, since his opponent will not have a normal plan.
12 ... £d7?
13 a4! 2c8
14 £f3 'tfc7
15 Qb5 ДхЬ5
16 ab £d4
17 c4!
A good positional move; the diagonal of the king’s bishop is extended, and the mobility of Black’s pieces is reduced.
17 ... de
18 de «Ъ8
The threat was 19 '«Ы.
19 ДеЗ
!9€lxd4!?cd20b3.
19 ... £lxf3+?!
After this Black is left without any counterplay. He should have sacrificed a pawn with 19...2fd8.
20 #xf3 Efd8
21 Efdl
With the annoying threat of 22 ■'ЙЪ7, winning a pawn.
21 ... Ec7
22 Ed6! Д(8
23 Sc6 Edc8 (92)
92 w
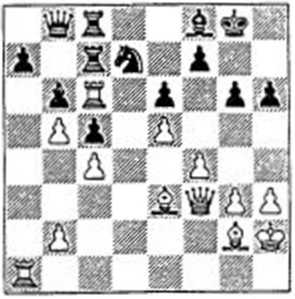
Now how should White continue? Black’s pieces have nowhere to go -they are hemmed in by their own pawn on c5. At this point it will be helpful to recall the ‘two-weakness principle’. It usually applies in the endgame, but also occasionally in the middlegame when the opponent is completely tied up and deprived of counterplay. Up to now White has been attacking on the quccnside. Black has parried the immediate threats, but nearly all his pieces arc stuck on that side of the board. In such cases a transfer of the attack to the other wing is very effective.
Threatening 25 h5.
25 g4
White needs to play Дс4 and Egl, but which move should come first? When realising an advantage, close attention must be paid to the opponent's counter-chances. The natural-looking 28 Дс4? is tactically refuted by 28...Exc6 29 be Дхе5‘. 30 fc 'йхеЗ-*-, with threats of
31...Wxb2+ and31...f5.
28 Egl!
White has a decisive advantage, which he conducted to victory.
When playing a system that suits you with Black with colours reversed, you can hardly ever borrow any concrete variations directly from the normal form of the opening. On the other hand, as I hope to have shown, you can in a broad sense utilise your knowledge of the typical plans, devices and assessments. Indeed it is generally true that to acquire a deep understanding of any opening, the study of overall ideas is at least as important as the memorising of specific variations.
It sometime^ happens that to solve the problems of one opening, you make use of precepts characteristic of an entirely different system. It follows that a practical player should not confine himself to studying games played with ‘his own' openings. You should select any well annotated games for study, even if the openings are wholly foreign to your repertoire. In this way you will not be extending your repertoire directly, but perhaps some game will serve as a pointer towards doing so. The main thing is that you will increase your stock of positional ideas, resources and judgements, which, xs I have said, can be applied in the most varied contexts when appropriate. Ideas that appeal to you should be recorded in the form of ‘positional images’, which we discussed during the previous session of the school.
Nczhmetdinov-Amateur (1951)
13 Wb31! ’S'xal (I3...'tfxb3 14 &xd7+ and 15 ab, with an extra piece for White) 14 ДЬ2 Wbl 15 £jf3! Wxhl 16 £lc5 (threatening mate in one) 16...c6 17 Axd7+ Sxd7 18 Bb8+ Sd8 (18...Фе7 19 <£c6 mate) 19 1»Ь5+ with a decisive attack.
The game concluded: 19.„Фс7 20 &Ъ7+ ±f6 21 ^xf7+ <d?g5 22 £f3+ <*h5 23 g4+! tf?xg4 24 Wxc6+ ФГ4 25 Дс5+ Фхс4 26 *£g5 mate.
Dvoretsky-Veselovsky (1967)
White's plan is clear: play on the qucensidc. In a suitable order, he intends Wa4, ДзЗ. Sb6/b8 etc.
In carrying out a plan, it is essential to take account of the opponent’s intentions. What does Black want here? Obviously it would pay him to relieve the pressure on his queensidc by playing 17...ДЬЗ to exchange off the light-squared bishops. For this reason, the natural-looking 17 Wa4? would be a serious inaccuracy.
The bishop exchange can easily be avoided by 17 3c 1. But otherwise this move is no use to White - it doesn’t fit into his plan.
The strongest continuation is 17 ДаЗ!. Increasing the pressure on the qucensidc. White simultaneously preserves his light-squared bishop from exchange. It is precisely moves like this - combining furtherance of your own plan with prophylaxis against that of the opponent - that in Nimzowitsch’s view constitute the essence of true positional play.
Black only lasted a few more moves: 17...3fc8 18 o’a 4 Wc7 19 SaS f5? (19.. Sd7, with a view to 2O...d5, was more logical; I would probably have replied 20 3b8 d5 21 31Ы de 22 31b7) 20 3b8 Д.Г8 21 ДЬ4 Wa7 22 Sal <d7 23 Заб Д.Г7 24 Да5 1-0. In the final position, the
queenside domination by White’s pieces is truly picturesque.